Lesson 4.4: Exposing Ports
Welcome to Lesson 4.4! By now, you've run containers on various networks and seen that containers on a bridge network can communicate internally without port mapping. But how do you make a container's service accessible from outside the Docker host? The answer lies in port publishing. In this lesson, we'll explore the -p and -P flags, understand how they work with bridge networks, and learn best practices for exposing ports securely.
Learning Objectives
TIP
By the end of this lesson, you will be able to:
- Explain the difference between exposing and publishing ports.
- Publish container ports using
-p(or--publish) with various syntaxes. - Use
-Pto publish all exposed ports automatically. - Understand how port mapping works with NAT (Network Address Translation) on bridge networks.
- Map ports to specific host interfaces (e.g.,
localhost). - Distinguish between
EXPOSEin Dockerfile and runtime port publishing. - Debug common port‑related issues.
1. Exposing vs. Publishing Ports
It's important to understand the distinction between exposing a port and publishing a port:
Expose (
EXPOSEin Dockerfile or--exposeat runtime) is documentation. It tells users which ports the container listens on, but does not make them accessible from the host. Exposed ports are visible indocker inspectand are used by-P(see below). They are optional.Publish (
-por--publishat runtime) actually maps a container port to a port on the Docker host, making it accessible from outside the container. This is required for external access when using bridge networks.
INFO
On a user‑defined bridge or the default bridge, publishing is necessary for traffic from the host to reach the container. On the host network, publishing is not needed (the container directly uses the host's ports), but you can still use -p to limit exposure.
2. Publishing Ports with -p (or --publish)
The -p flag follows this syntax:
-p [host_ip:]host_port:container_port[/protocol]host_ip(optional): The IP address on the host to bind to. If omitted, the container listens on all host interfaces (0.0.0.0).host_port: The port number (or range) on the host.container_port: The port number (or range) inside the container./protocol: Optional; can betcp(default) orudp.
2.1. Basic Port Mapping
Map host port 8080 to container port 80 (HTTP):
docker run -d --name web -p 8080:80 nginxNow visiting http://localhost:8080 will reach the Nginx container.
2.2. Map to a Specific Host IP
Bind only to the loopback interface (localhost) to prevent external access:
docker run -d --name web -p 127.0.0.1:8080:80 nginxNow the container is only reachable from the host itself, not from other machines on the network.
2.3. Map UDP Ports
By default, ports are TCP. For UDP, specify the protocol:
docker run -d --name dns -p 53:53/udp -p 53:53/tcp mydns2.4. Map a Range of Ports
You can map a contiguous range:
docker run -d --name app -p 9000-9005:9000-9005 myappThis maps ports 9000-9005 on the host to the same ports inside the container.
2.5. Random Host Port Allocation
If you specify only the container port, Docker assigns a random high port on the host:
docker run -d --name web -p 80 nginxUse docker port web to see which host port was assigned.
3. Publishing All Exposed Ports with -P
If a Dockerfile contains EXPOSE instructions (e.g., EXPOSE 80 443), you can publish all of them to random host ports using -P (uppercase):
docker run -d --name web -P nginxDocker assigns random host ports for each exposed port. Use docker port web to see the mappings.
This is useful for quick tests where you don't care which host ports are used.
4. How Port Publishing Works Under the Hood
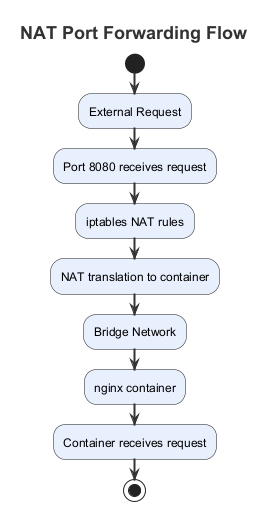
When you publish a port on a bridge network, Docker creates a NAT (Network Address Translation) rule in the host's firewall (iptables on Linux). Traffic arriving at the host on the specified port is forwarded to the container's IP and port.
INFO
On Linux, you can see these rules with sudo iptables -t nat -L (look for DOCKER chain).
This is why containers on a bridge network cannot be accessed directly by their IP from the host unless you publish ports; the host's network stack is separate from the bridge network.
Visual: NAT Port Forwarding Flow
5. Publishing Ports in Docker Compose
In Docker Compose, you define port mappings under the ports key:
services:
  web:
    image: nginx
    ports:
      - "8080:80"            # host:container
      - "127.0.0.1:8081:80" # bind to localhost
      - "80"                 # random host port
6. Port Conflicts
If the host port you specify is already in use by another process (including another container), Docker will return an error. Either stop the conflicting container, change the host port, or use a random port.
7. Debugging Port Mappings
Use these commands to inspect port mappings:
docker port <container>: Shows all published ports for a container.docker inspect <container>: Look forNetworkSettings.Ports.docker ps: Shows published ports in thePORTScolumn.
8. Best Practices for Port Publishing
TIP
- Avoid using
-p 80:80in production unless you control the host's firewall. Use a reverse proxy (like Traefik or Nginx) that listens on port 80 and routes to containers on internal ports. - Bind to
127.0.0.1when the service should only be accessible locally (e.g., admin interfaces). - Use random host ports (
-p 80) for temporary containers or when the exact port doesn't matter. - Prefer specific, well‑known ports for production (e.g., 8080 for app, 3306 for MySQL) but consider using a reverse proxy.
- Expose ports in Dockerfiles (
EXPOSE) to document intent, even if not required.
Hands-On Tasks
Task 1: Basic Port Mapping
- Run an Nginx container mapping host port 8080 to container port 80:bash
docker run -d --name nginx1 -p 8080:80 nginx - Open a browser and visit
http://localhost:8080. You should see the Nginx welcome page. - Check the mapping with
docker port nginx1. - Stop and remove the container.
Task 2: Multiple Ports
- Run a container with multiple port mappings (e.g., a web app on 8080 and a debug port 5000):bash
docker run -d --name multi -p 8080:80 -p 5000:5000 nginx - Use
docker psto verify both mappings. - Inspect with
docker port multi.
Task 3: Bind to Localhost Only
- Run an Nginx container mapped only to localhost:bash
docker run -d --name local-only -p 127.0.0.1:8080:80 nginx - Access
http://localhost:8080– it works. - Find your host's IP (e.g.,
ifconfigorip addr), and tryhttp://<host-ip>:8080from another machine on the same network. It should fail because the port is bound only to loopback.
Task 4: Random Host Port
- Run a container with
-p 80:bashdocker run -d --name random -p 80 nginx - Check the assigned host port with
docker port random. It will show something like80/tcp -> 0.0.0.0:32768. - Visit
http://localhost:32768(replace with the actual port). You should see Nginx. - Remove the container.
Task 5: Using -P with EXPOSE
- Create a Dockerfile (or use an image that already has
EXPOSE). For example, the official Nginx image hasEXPOSE 80. Run:bashdocker run -d --name expose-demo -P nginx - Check the published ports with
docker port expose-demo. - Access the service using the host port.
Task 6: Port Conflicts
- Run a container using port 8080:80.
- Attempt to run another container also mapping to 8080:80. Observe the error.
- Resolve by using a different host port or stopping the first container.
Task 7: Inspect Ports with docker inspect
- Run a container with multiple port mappings.
- Use
docker inspect <container>and look forNetworkSettings.Ports. See the detailed mapping.
Summary
Key Takeaways
- Publishing ports (
-p,-P) makes container services accessible from the host. - Basic syntax:
-p host_port:container_port. - You can bind to a specific host IP, map UDP, use ranges, or let Docker assign a random host port.
-Ppublishes all ports listed inEXPOSEinstructions.- Port publishing works through NAT on bridge networks.
- Use
docker portanddocker inspectto see mappings. - Best practice: Bind to localhost when possible, use reverse proxies for production.
Check Your Understanding
- What is the difference between
EXPOSEin a Dockerfile and-pat runtime? - Write a
docker runcommand to map host port 8080 to container port 80, and also map host port 3306 to container port 3306 for MySQL. - How do you map a container's UDP port 53 to host port 53?
- What does the
-Pflag do? - How can you make a container only accessible from localhost on the host?
- What command shows you the port mappings for a running container?
Click to see answers
EXPOSEis documentation—it tells which ports the container uses but doesn't actually publish them.-pat runtime creates the actual port mapping that makes the port accessible from the host.docker run -d --name mysql -p 8080:80 -p 3306:3306 mysql-imagedocker run -d --name dns -p 53:53/udp mydns-image-Ppublishes all ports listed in the Dockerfile'sEXPOSEinstructions to random host ports.- Use
docker run -p 127.0.0.1:8080:80 imagenameto bind only to the loopback interface. docker port containernameordocker inspect containername(look for NetworkSettings.Ports).
Additional Resources
- Docker run: publish ports
- Docker container networking: publish ports
- Using iptables to inspect Docker NAT rules
Next Up
In the next lesson, we'll explore the Container Network Model (CNM) and how Docker's networking architecture fits together at a deeper level. See you there!