Lesson 4.2: Bridge Networks
Welcome to Lesson 4.2! In the previous lesson, you learned about the default Docker networks and the basics of container communication. Now we'll focus on the most commonly used driver: bridge. You'll understand the differences between the default bridge and user‑defined bridge networks, how to create custom bridges, and how containers communicate within them. By the end, you'll be able to design isolated, secure networks for your applications.
Learning Objectives
TIP
By the end of this lesson, you will be able to:
- Differentiate between the default bridge and user‑defined bridge networks.
- Create and manage custom bridge networks with
docker network create. - Explain how DNS‑based service discovery works on user‑defined bridges.
- Connect and disconnect containers from bridge networks.
- Customize bridge network parameters (subnet, gateway, IP ranges).
- Understand when to use the default bridge vs. a custom bridge.
1. The Bridge Network Driver
The bridge driver creates a private internal network on the host. Containers attached to the same bridge network can communicate with each other. The bridge itself acts as a virtual switch.
- Each bridge network is isolated from other bridge networks.
- Containers on the same bridge can communicate via IP addresses (and names on user‑defined bridges).
- Outbound traffic (to the internet) is NAT‑ed through the host's network interface.
- Inbound traffic must be explicitly published using
-por--publish.
INFO
Docker provides two kinds of bridge networks:
- The default bridge (named
bridge) created automatically. - User‑defined bridge networks you create.
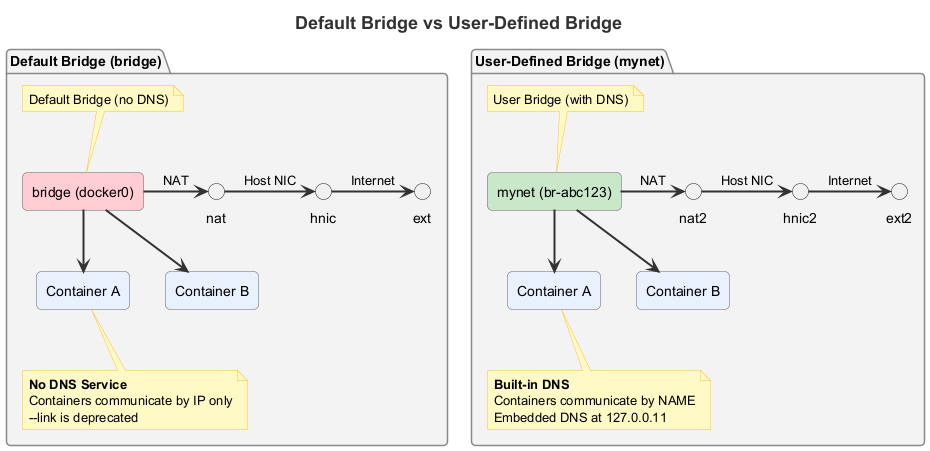
2. Default Bridge vs. User‑Defined Bridge
| Feature | Default Bridge | User‑Defined Bridge |
|---|---|---|
| Creation | Automatic (named bridge) | Manual with docker network create |
| DNS resolution | No automatic name resolution; use --link (deprecated) | Yes, containers can resolve each other by name |
| Isolation | All containers on default bridge can talk to each other (no isolation between apps) | Each custom bridge is isolated; only containers on same network can communicate |
| Connectivity | Containers can be connected, but IP addresses may change | Stable container names and DNS |
| Configuration | Limited; you can change daemon defaults but not per‑container | Full control: subnet, gateway, IP range |
| Best for | Simple testing, single‑container scenarios | Multi‑container applications, production |
Visual: Default Bridge vs User-Defined Bridge
3. Creating and Managing User‑Defined Bridge Networks
3.1. Create a Simple Bridge Network
docker network create my-bridgeThis creates a bridge network with default settings (subnet chosen automatically).
3.2. Create a Bridge with Custom Subnet and Gateway
You can specify the subnet, gateway, IP range, and other options:
docker network create \
  --driver bridge \
  --subnet=172.20.0.0/16 \
  --ip-range=172.20.10.0/24 \
  --gateway=172.20.10.1 \
my-custom-bridge--subnet: CIDR for the network.--ip-range: Range of IPs to assign to containers (optional).--gateway: Gateway IP (usually the first address in the subnet).
3.3. List and Inspect Networks
docker network ls
docker network inspect my-bridge
3.4. Remove a Network
docker network rm my-bridge(Only if no containers are attached.)
4. Connecting Containers to a Bridge Network
4.1. Run a Container on a Specific Network
docker run -d --name web --network my-bridge nginx4.2. Connect an Existing Container to a Network
docker network connect my-bridge web4.3. Disconnect a Container
docker network disconnect my-bridge webTIP
A container can be connected to multiple networks simultaneously. This is useful for scenarios like a database that needs to be accessible by two different application networks.
5. Container Communication on a User‑Defined Bridge
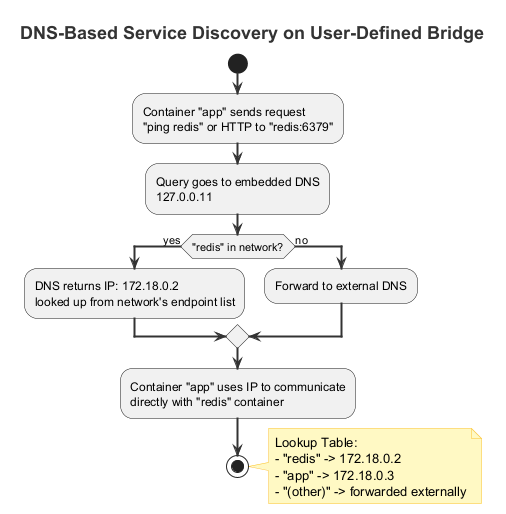
5.1. DNS‑Based Service Discovery
On a user‑defined bridge, containers can reach each other by container name. Docker provides an embedded DNS server that resolves names to IP addresses.
Example:
- Create a network
app-net. - Run two containers:bash
docker run -d --name redis --network app-net redis docker run -d --name app --network app-net my-app - Inside
app, you can connect toredisusing the hostnameredis. This works even if the IP address changes.
TIP
Why is this important? Your application can hardcode the container name (or use environment variables) and not worry about IP changes.
5.2. Network Aliases
You can give a container multiple DNS names using --network-alias:
docker run -d --name db --network app-net --network-alias database --network-alias primary-db postgresNow other containers can reach this container via db, database, or primary-db.
5.3. Communication with the Default Bridge
Containers on a user‑defined bridge cannot directly communicate with containers on the default bridge unless you connect them to both networks. You can also use --link (deprecated) but it's not recommended.
Visual: DNS Resolution Process
6. Publishing Ports on Bridge Networks
By default, containers on a bridge network are only accessible from other containers on the same network. To make a service accessible from the host or external network, publish ports:
docker run -d --name web --network my-bridge -p 8080:80 nginxThe -p flag maps a host port to the container port. This works for any bridge network.
If you want to expose a service only to other containers and not to the host, omit -p. The service will still be reachable from other containers on the same bridge via its container IP and port.
7. Advanced: Inter‑Container Communication Without Port Publishing
When containers are on the same bridge network, they can communicate using the container's internal port (the port the application listens on inside the container). No host port mapping is needed for this internal communication.
Example:
- A web container (listening on port 80) and a database container (listening on port 5432) on the same custom bridge.
- The web container can connect to
database:5432directly, without any-p. - This is more secure because the database port is not exposed to the host.
8. Use Cases for Custom Bridge Networks
TIP
Custom bridge networks are ideal for:
- Multi‑container applications: A web frontend and a backend database. Both on the same custom bridge, with only the web frontend publishing a port.
- Microservices: Each microservice runs on its own bridge network, with a shared network for services that need to communicate.
- Isolation: Different teams or applications can use separate bridge networks to avoid accidental conflicts.
- Testing: Create temporary networks for test environments.
9. Hands-On Tasks
Task 1: Create and Explore a Custom Bridge
- Create a bridge network named
mynet:bashdocker network create mynet - Inspect the network:bashNote the
docker network inspect mynetSubnet,Gateway, andContainers(empty for now).
Task 2: Run Containers on the Custom Bridge
- Run two containers on
mynet:bashdocker run -d --name c1 --network mynet alpine sleep 3600 docker run -d --name c2 --network mynet alpine sleep 3600 - Exec into
c2and pingc1:bashThe ping should succeed.docker exec -it c2 ping c1 - Inspect the network again:
docker network inspect mynet. You'll see both containers listed with their IP addresses.
Task 3: Test DNS Resolution
- From
c2, try to resolvec1usingnslookup(you may need to install bind‑tools or just useping):bash(Ifdocker exec -it c2 nslookup c1nslookupis not available, install it withapk add bind-toolsor use a different image.) - Observe that the container name resolves to its IP.
Task 4: Create a Network with Custom Subnet
- Create a network with a specific subnet:bash
docker network create --driver bridge --subnet=192.168.100.0/24 my-custom-net - Run a container on this network and check its IP:bashThe IP should be within the 192.168.100.0/24 range.
docker run -it --rm --network my-custom-net alpine ip addr show eth0
Task 5: Use Network Aliases
- Create a container with multiple aliases:bash
docker run -d --name app --network mynet --network-alias web --network-alias frontend nginx - From another container on the same network, ping each alias:bash
docker run --rm --network mynet alpine ping -c 2 web
docker run --rm --network mynet alpine ping -c 2 frontend
Task 6: Connect a Container to Two Networks
- Create a second network
mynet2:bashdocker network create mynet2 - Connect
c1tomynet2:bashdocker network connect mynet2 c1 - Inspect
c1:bashLook at thedocker inspect c1NetworkSettings.Networkssection – you'll see both networks with separate IPs. - From a new container on
mynet2, pingc1:bashIt should succeed becausedocker run --rm --network mynet2 alpine ping c1c1is on both networks.
Task 7: Compare with Default Bridge
- Run a container on the default bridge:bash
docker run -d --name d1 alpine sleep 3600 - Run another container also on the default bridge:bashInside, try to ping
docker run -it --rm alpine shd1by name. It will fail because the default bridge does not provide DNS resolution. - To make them communicate, use IP addresses (find IP of
d1withdocker inspect d1). Then ping from the second container.
Summary
Key Takeaways
- The bridge driver creates a private network on the host.
- Default bridge is limited: no automatic DNS, no isolation.
- User‑defined bridges provide DNS‑based service discovery and better isolation.
- Use
docker network createto create custom bridges, optionally specifying subnet, gateway, etc. - Containers on the same user‑defined bridge can reach each other by container name.
- Use
--network-aliasto give additional names. - A container can be connected to multiple networks simultaneously.
- Publish ports with
-pto expose services to the host.
Check Your Understanding
- What is the main advantage of using a user‑defined bridge over the default bridge?
- How do you create a bridge network with a subnet
172.20.0.0/16? - Two containers on the same user‑defined bridge: can they communicate using container names? Why?
- How do you connect a running container to a network?
- What is the purpose of
--network-alias? - Do containers on a user‑defined bridge need port publishing to communicate with each other? Why or why not?
Click to see answers
- User‑defined bridges provide automatic DNS resolution, allowing containers to communicate by name. They also offer better isolation and full configuration control.
docker network create --driver bridge --subnet=172.20.0.0/16 mynetwork- Yes. User‑defined bridges include an embedded DNS server (127.0.0.11) that resolves container names to IP addresses.
docker network connect networkname containername--network-aliasgives a container additional DNS names, so other containers can reach it by any of those aliases, not just its container name.- No. Containers on the same bridge network can communicate directly using the container's internal port. Port publishing (
-p) is only needed to expose services to the host or external network.
Additional Resources
Next Up
In the next lesson, we'll cover the host and none networks in more detail, exploring use cases and limitations. See you there!